Now that more and more people are coming out of their homes, you might be thinking of making that salon appointment to change up your look. Still, there might be some things even scarier than braving the outside world to make it to the salon, like compromising your hair’s health.
A lot of professional hairstylists are definitely more than qualified to color your hair and keep it looking healthy and shiny, but if you’re a little wary of putting your hair in some stranger’s hands, why not take it in your own?
Some people make summer plans to go to the beach or book staycations. I kicked my #HotGirlSummer this year off by deciding to bleach my hair. After years of having the same old look, I didn’t even have a particular shade or color in mind. I just knew I wanted to be rid of my boring black hair, if only temporarily.
Yes, it was impulsive—but I wasn’t going to be stupid about it.
The decision to bleach my hair was quickly succeeded by hours of mania-fueled Google searches, and browsing for the right products: not just for the bleaching process, but for pre-treating, and maintaining my new ‘do. My hair wasn’t something I took care of religiously. I overwashed it, I brushed it way too harshly, and yet somehow it stayed manageable and healthy. Stripping it of all color meant turning it into a whole new beast of its own—or more fittingly, a baby. There’s no way my non-existent hair care routine would be enough for bleached hair to survive.
Going blonde might seem like an easy choice, but a lot of care has to go into the process if you want your hair to come out of it alive and not looking like a dry pile of straw.
PREP
Even after doing all the research, if bleach-fail videos with hundreds of thousands of views haven’t scared you off yet, it’s still not time to break out the lightener. Evaluating your hair type and health is crucial before anything else. I already knew my fine virgin hair wouldn’t take too well to the bleaching process, so making sure all of it wouldn’t fall out was priority number one.
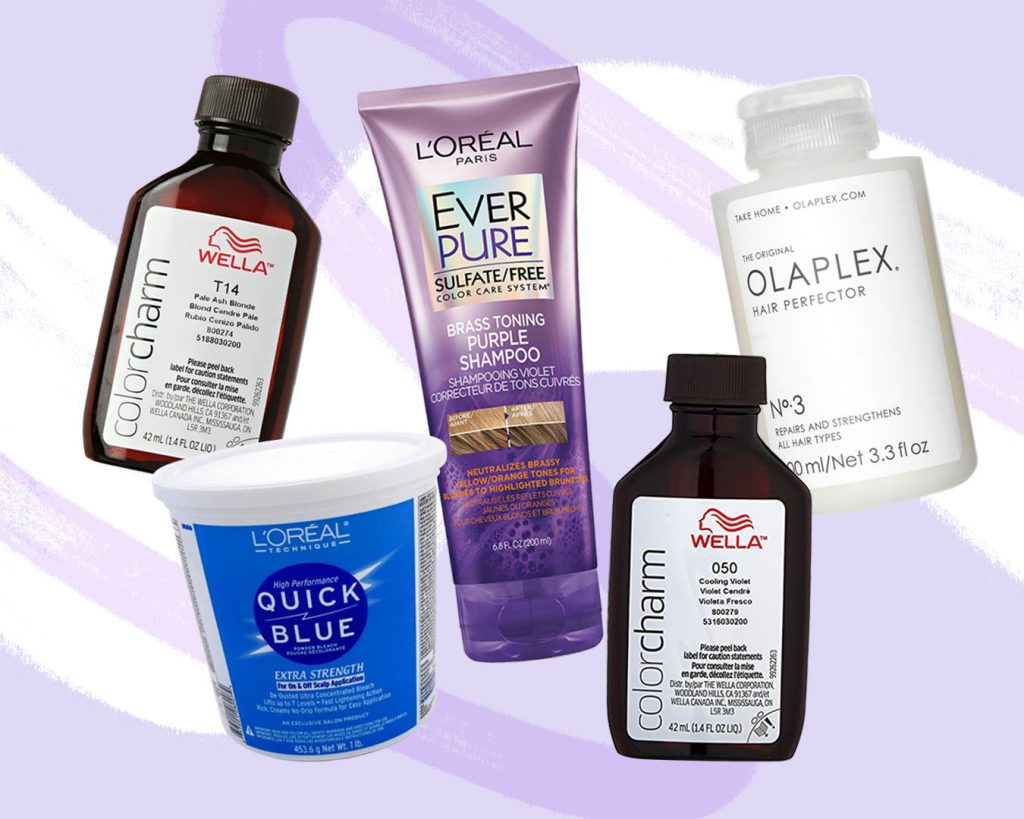
For at least a few weeks before you plan on putting your hair through the damage that bleaching will inevitably cause, show it some love and get it back to optimal health. Hair masks and deep conditioning treatments are a must if you want to minimize damage. And if your hair is quite fine or brittle, invest in a bond builder: Olaplex No. 3, the brand’s take-home formula that countless celebs swear by, has been a godsend.
Bond builders like Olaplex repair the broken disulfide bonds in your hair from the inside of the hair follicle, preventing breakage and improving your hair’s strength and elasticity. Apply the Olaplex through damp, towel-dried hair and leave on for 10 minutes or longer. Regularly treating your hair with Olaplex will visibly cause less damage, especially if you know you’re going to be bleaching or coloring your hair multiple times.
Going blonde might seem like an easy choice, but a lot of care has to go into the process if you want your hair to come out of it alive and not looking like a dry pile of straw.
It’s important to remember that bleach and developer are very strong compounds. They’re meant to work together to open up the cuticle of the hair shaft and oxidize the melanin that’s inside. While there’s plenty of accessible products on online marketplaces or maybe even at your local mall, skimping on something so corrosive that’s meant to stay on your head for at least a half hour might cost you your hair’s health.
L’Oréal’s Quick Blue Bleach Powder works wonders lightening hair, and doesn’t irritate the skin. Blue bleach is especially helpful for those going from black or very dark brown hair, which naturally contains a lot of red and orange pigments. The blue bleach will cancel out these colors and prevent the brassy blonde look many people avoid.
Generally, if you’ve got darker hair, you’ll have to use stronger developers. 40-volume is the highest-strength developer available, and can lighten up to seven levels, but can quite literally melt your hair off if left on for too long. Since you’re doing your bleach job at home and with little to no help, go for 30- or 20-volume. You’ll have to bleach your hair a few more times than you might have to with 40-volume, but will significantly reduce the damage done to your hair.
Because your hair and scalp are essentially about to get all the life sucked out of them, you’ll want to avoid washing your hair for at least a few days before. Building up the natural oils in your hair will protect your scalp and make sure your hair isn’t completely stripped of moisture before you bleach it.
Washing your hair can actually agitate your scalp and leave tiny abrasions that you absolutely should not get bleach on. Not to mention, washing it beforehand can leave it in its most fragile state and more prone to breakage, which is the last thing you want when you’re about to put it through such an extreme chemical process.
PROCESS
Now you’ve done your hair masks and have greased up your hair to the point of stringiness – “can I bleach it now?”
Well, yes, but it only gets harder from here.
Dress down
There’s no way around it – this is going to be a very messy task. Make sure you’re wearing a shirt you don’t mind getting bleach stains on. You can also keep an old towel over your shoulders and neck to keep your bleached hair from touching your skin.
Section
Before anything else, and for your own sanity, section your hair. Once the bleach gets on there, it can be impossible to manage if your sectioning isn’t neat, and you’ll have a much easier time spotting any lengths you might have missed.
A good way to start off your sectioning is by parting your hair down the middle, and parting each of those halves from just behind the ear up to the crown of your head. Depending on the thickness of your hair you can divide them into smaller sections; you just want to make sure that you can really saturate each one with your bleach mixture.
Apply
Mix your bleach with your developer at the ratio instructed by the manufacturer. Once it’s at a consistency that’s smooth and creamy, apply the bleach starting at the midsections towards the ends. These areas tend to take a little longer to process because the bleach dries out quicker, but you can use foils to keep your sections moist and keep the heat locked in while you work on the rest of your head.
Bleach works better in heat, and the heat from your scalp will make those areas lighten a lot faster than the rest of your hair. Leave your roots for the end of your application so you’ll have an even lightening all over and don’t get hot roots.
Wait
Check your hair every 10-15 minutes to see how much it’s lightened. Some people like to do a test strand somewhere on the back of their head to see exactly how much time is needed for it to lighten to the level they can process the rest of the head accordingly.
Once you’re satisfied with the lightening (or once you’ve kept the bleach on for the maximum time the instructions allow), you can rinse off all the bleach. Try to start with the sections you processed first, just to be sure that you’ve got an even base.
Remember to use warm water: the bleach and incubation has heated up your fragile hair, and running it under cold water can shock the hair and cause some more breakage.
Anyone thinking of taking the chance could end up with beautiful blonde hair, if they do some proper research and commit to maintaining their hair’s health. The cherry on top? You get to tell people you did it all by yourself.
Evaluate your hair
Do you need to bleach it a few more times? Do you want to go ahead and tone or color to your desired shade? Is your hair still healthy enough to go through another session?
Some people bleach their hair multiple times in one sitting. While that all depends on the integrity of your hair at this step, it’ll cause a lot less damage if you wait at least a week before processing again. If your hair is looking pretty gummy and brittle, give it two or more weeks before your next session. Use this time to nurse your hair back to health.
Trust the process
You might have to deal with an ugly blonde for a while. It took five bleaching sessions, spread out over the course of a month, for my hair to get to a level nine blonde using 20-volume developer. While some hairstylists might be able to get your black hair to a very light blonde in one or two appointments, I wasn’t about to risk frying off my hair using the higher-concentration developers salons would.
The overall health of your hair takes precedence over the kind of look you’re trying to achieve. After all, what good is bleached hair if it’s dull and lifeless? Take the time you need to get your hair as light as it needs to be for the color you want, and go from there.
Tone
Arguably the most exciting part of bleaching your hair, toning is the last step before you’re ready to flaunt your new ‘do.
Toning can perfect your lightened hair to the shade of blonde you’re looking to get. If your hair still has a lot of yellow and orange tones in it, go for violet or blue-based toners to cancel those hues out. Wella’s Color Charm collection of liquid toners contains a wide variety of shades appropriate for different blonde levels.
If you’re looking to eventually color your hair a bright color, toning can help ensure that the dye goes on an even blonde base and comes out the way you intended without any errant yellow or orange hues mixed in.
PRESERVE
Now that you’ve gone through all the nitty-gritty, you can take a step back and relax, so to speak.
Your hair will still need a lot of care to keep it healthy and shiny. Continue using Olaplex a few times a week, and a hair mask every now and then to keep your hair from drying out too much.
Because the pigments in your hair from toning or coloring fall out with every wash, try to only wash your hair two or three times a week. Incorporate a dry shampoo with UV-protectant properties into your routine. The sun can also cause your color to fade and bring out the warmer tones you had previously cancelled out.
Use purple shampoo with every wash to help prolong your dye job. L’Oreal’s Ever Pure Brass Toning Shampoo is a sulfate-free shampoo that works well to deposit purple tones on the surface of the hair shaft, leaving it looking vibrant and shiny, while also preserving the pigments within the cortex of your hair. Leave the shampoo on for a few minutes before rinsing out and follow up with L’Oreal’s Ever Pure Brass Toning Conditioner.
As your hair grows out, you will eventually have to touch up your roots.
PROCEED
Eventually, when you’re bored of the blonde and sick of the maintenance it comes with, you’ve still got plenty of options and ways to experiment. Consider trying out some crazy fashion colors and make the most out of having lightened hair. Whether it’s vibrant neon shades or subtle pastel ones you’re looking to go for, there are some colors you really would not be able to wear once you go back to black and start growing your natural hair out.
Demi- or semi-permanent dyes don’t lift your hair and simply deposit color onto the surface and at most, the first layer of the hair shaft. These dyes will fade a lot quicker, but add a lot more shine and vibrancy to your fading permanent color or toner.
If you’re looking to go back to your natural color, use clarifying shampoo to remove the product built up in your hair and start over with your clean, bleached base. Since you’ve already lightened your hair, going back to your natural color will be next to impossible without first filling your hair with the many pigments it needs to build up to black or dark brown. Choose a permanent color with warm tones like red and orange to color your hair before you go over it with black. Not having these pigments can cause any black hair dye to fall out of your porous hair quicker and leave it looking dull.
Bleaching your hair on your own is, without question, a very daunting and tedious process. For some people, the fear of messing up their own hair can be enough to keep them from doing it. Still, anyone thinking of taking the chance could end up with beautiful blonde hair, if they do some proper research and commit to maintaining their hair’s health. The cherry on top? You get to tell people you did it all by yourself.
Wow! Great article!You really did your homework… good to know that your hair will still be healthy!